Element Call
annotated and documented by Ralf Zerres and all contributers
This version of the text assumes you’re using Element-Call v0.6.7 or later in
conjuction with Rust v1.83.0 or later. Cargo.toml should define
edition="2021". That enables and uses Rust 2021 Edition idioms in
all derived projects.
See the “Installation” section of Chapter 2 to install or update Element-Call.
The 2021 Edition of this book is the initial release. It will be released with the Element-Call version 1.0.0.
- Appendix A “Keywords”, explains the new raw identifiers.
- Appendix D “Translations”, is work in progress. We will release instances of this book in the target language once they are translated.
For online reading, a HTML rendered version is available at
Element-Call book. Alternatively you might want to have it handy
for offline usage. Either you downlaod a rendered pdf or
ebookversion or go ahead and download the source. Then kick on
mdbook (the definition of the target location is optional).
mdbook build --dest-dir book_en --open
Foreword
The history of computer-aided communication, which supports not only
text video and sound goes back to the 1990s. From from today’s
perspective, it seems almost grotesque what prices had to be paid for
the had to be paid for the hardware developed at that time. Not only
for the quality and quality of encoded data streams, new formats had
to be invented (CIF (CIF, QCIF). The development of Codex was in its
infancy. infancy. There was a lack of
standardization. Interoperability and and the use of the Internet were
at best distant goals. People were working on very
application-specific solutions and approaches that had the potential
for affordable components for mass production. As an example, the
pioneering manufacturer Parallax Graphics Inc.. Founded in 1982 by two graduates of Cornell
University, the company focused on the marketing of the marketing of
high end graphics cards, including for the then popular university
environment at the time. These cards initially cost around €25,000
and supplied ASICS and a codex implemented in implemented in hardware,
which could realize resolutions of up to 1280x1024 pixels could be
realized.
Every commercially available cell phone, tablet, notebook and desktop PCs currently deliver graphics card performance that can render 2k, even 4k pixels can render. Encoding and decoding solutions are decoding solutions have been standardized internationally, which have significantly reduced the bandwidths to be transmitted and thus and thus enable billions of uses on the Internet use on the Internet. One-to-one video telephony has been established for years. established for years. And everyone will remember the radical upheaval in the professional use of video conferencing solutions that the COVID pandemic brought with it in 2022.
Today, the use of video conferencing solutions is ubiquitous. In the
working world, proprietary solutions are often used, to implement work
processes regardless of location. Examples include the products from
the manufacturers CISCO->(Webex),
Microsoft->(Skype,Teams), HP->(Poly)
and Zoom->(Zoom) are listed. But also free software such as
BigBlueButton, Jitsi or
Nextcloud->(Talk) are enjoying worldwide distribution.
With Element-Call the Matrix ecosystems gains a new approach that
fully embraces the potential of MatrixRTC. Think of participents in
decentralized domains that are to able to dynamicly create and manage
multipoint meetings in an efficiant manner. An Open-Source, that
enables fee choice of any Matrix complient Client. What progress.
— Ralf Zerres
Introduction
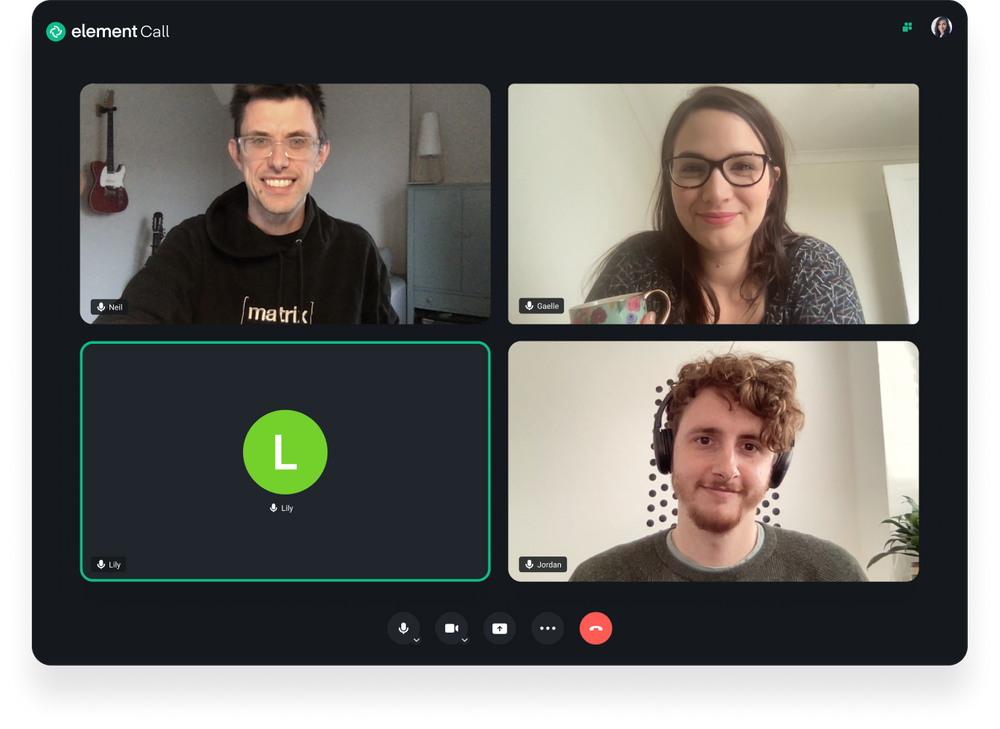
Welcome to Element-Call, an introductory book about the Matrix based
video conferencing subsystem.
Warning: This book is incomplete. Documenting everything and rewriting outdated parts take a while. See the issue tracker to check what’s missing or outdated. If there are any mistakes or ideas that haven’t been reported, feel free to open a new issue there.
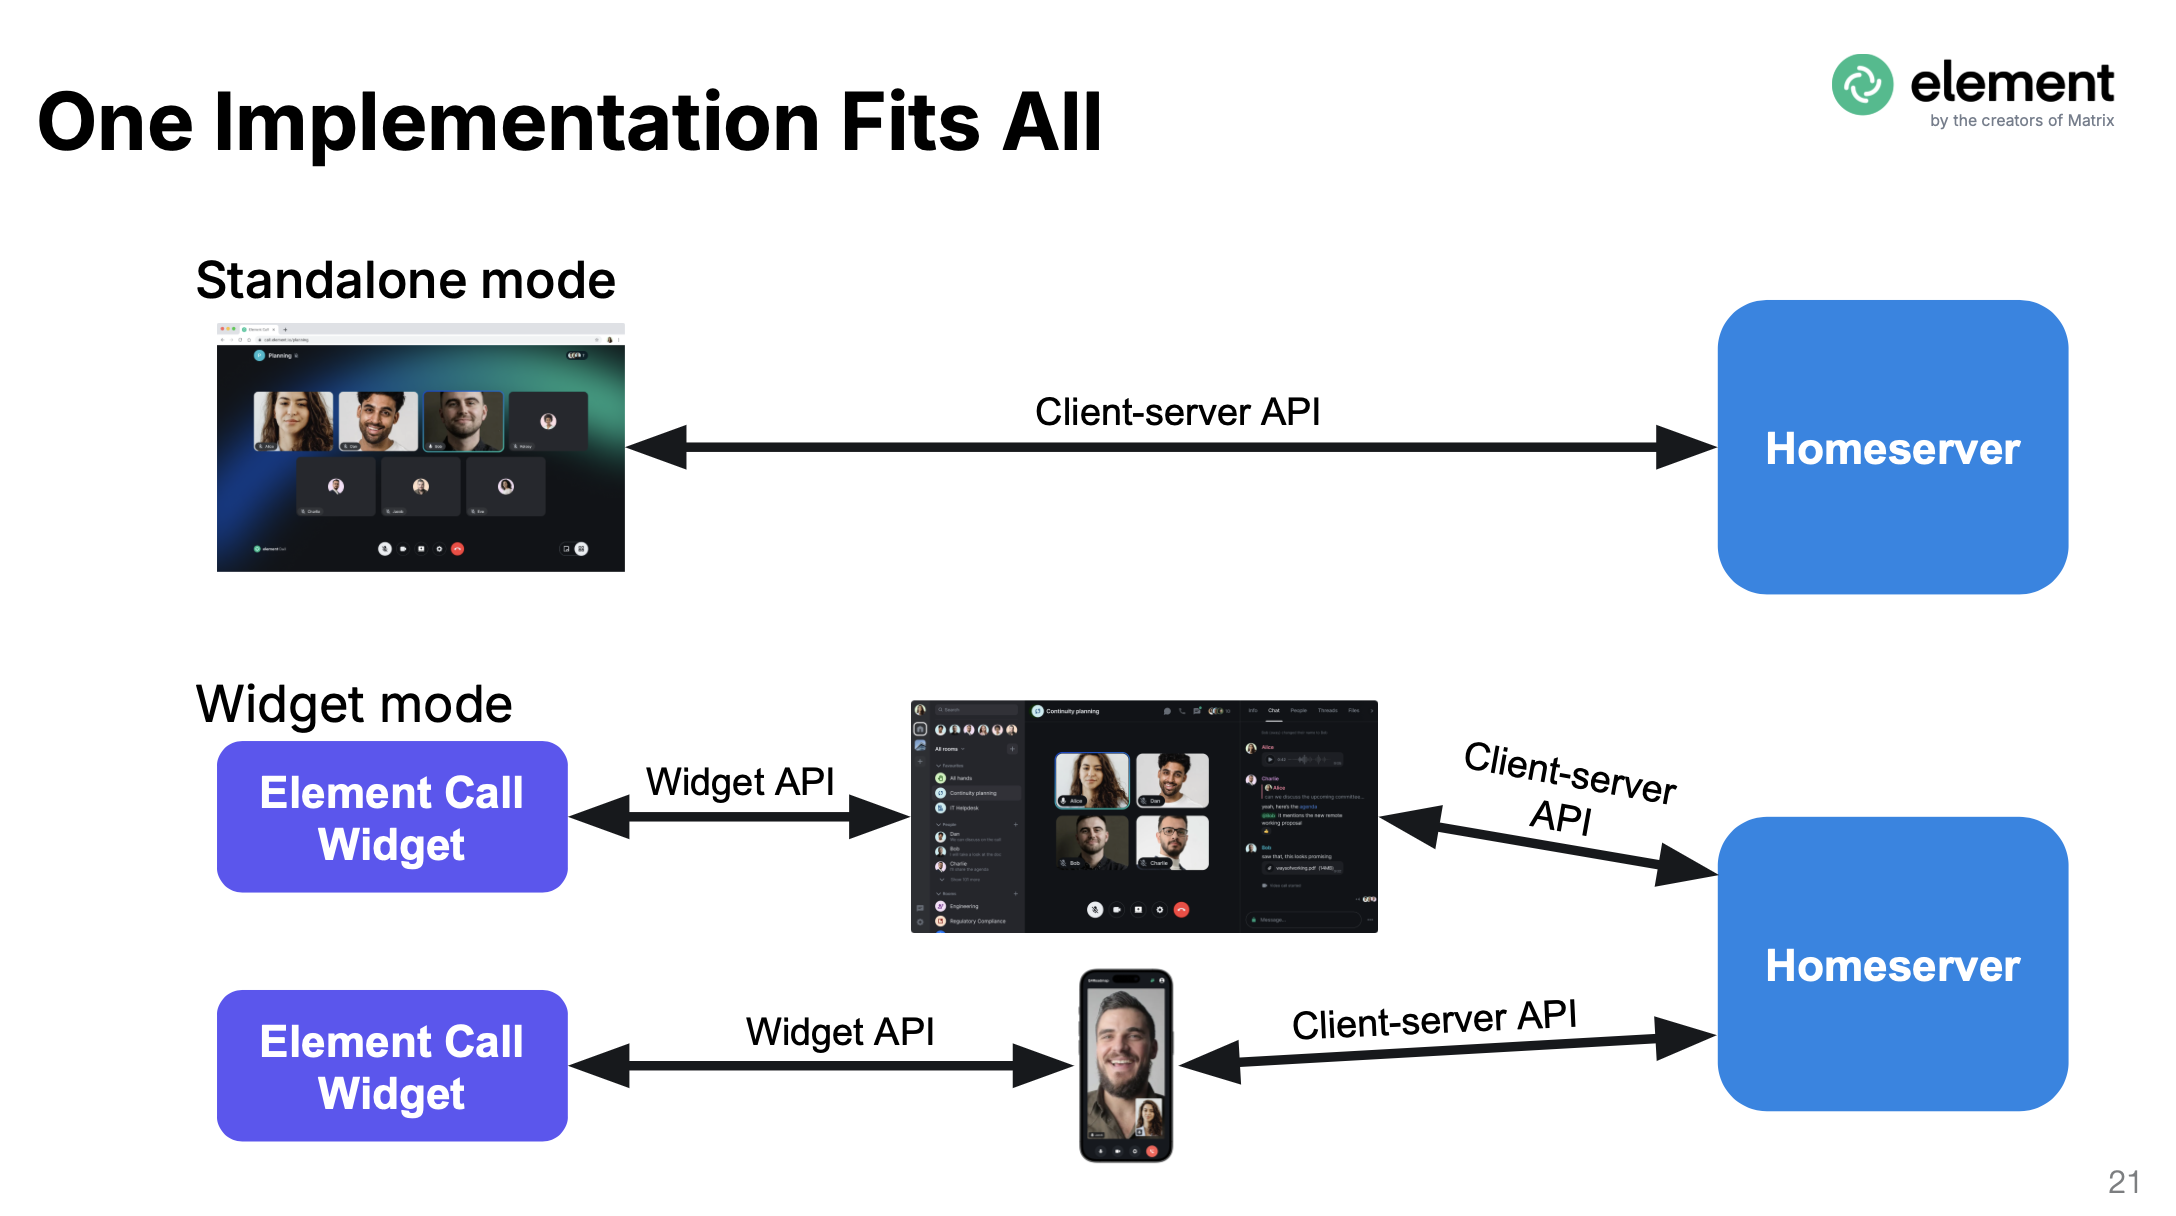
Element-Call fully embraces the potential of MatrixRTC. All
supported clients will connect via the genreric API, though selecting
their prefered mode (standalone- vs. widget-view).
Features
- Modern WebRTC API (powered by LifeKit)
- Custom widgets
- WebBrowser suport
- Custom theming engine
- Localization
Supported Backend Platforms
- Linux (native)
Supported Client Platforms
- Matrix clients (e.g. Element X, ShildiNext)
- WebBrouwsers (e.g. Brave, Chrome, Edge, Firefox)
Who Element-Call Book Is For
The intention of Element-Call book is to help interested developers and administrators to get familiar with the structure and the componets choosen to implement a fully functional decentralized video conferencing solution. It will offer the needed in depth information to get in touch with the codebase. It will also aid an administrator to set up the needed software components to build up a self hosted installation.
Source Code
The source files of the book are maintained as a git submodule found at Element-Call book.
Getting Started
Let’s start your Element-Call journey! There’s a lot to learn, but every journey starts somewhere. In this chapter, we’ll discuss:
- The building blocks of Element-Call
- Installing Element-Call
Building blocks
Historically Elememnt-Call did implement an infrastructure, where
all participants were fully meshed. That means all participants had a
direct peer to each other. This structure does work quite well with a
low number of call partners (e.g 1:1 sessions). Clearly this structure
is totally inefficient and collapsing, as soon as the number of
participants rises: The needed number of streams that have to be
synchronized are increasing exponentionally.
Most commercial solutions overcome this bottleneck utilizing a MCU-structure: Each participant of the call is directly connected to the controlling MCU (the head).
MCU routing has disadvantages and shortcommings too.
- You can’t assign different egress parameters from the MCU to individual participant streams
- A single MCU can’t handle distributed structure
Since the nature of Matrix based communication makes use of a distributed infrasturcture, MatrixRTC need to handle this aspect. It is implemented with an SFU backend.
The following image visualize the differences inside the available
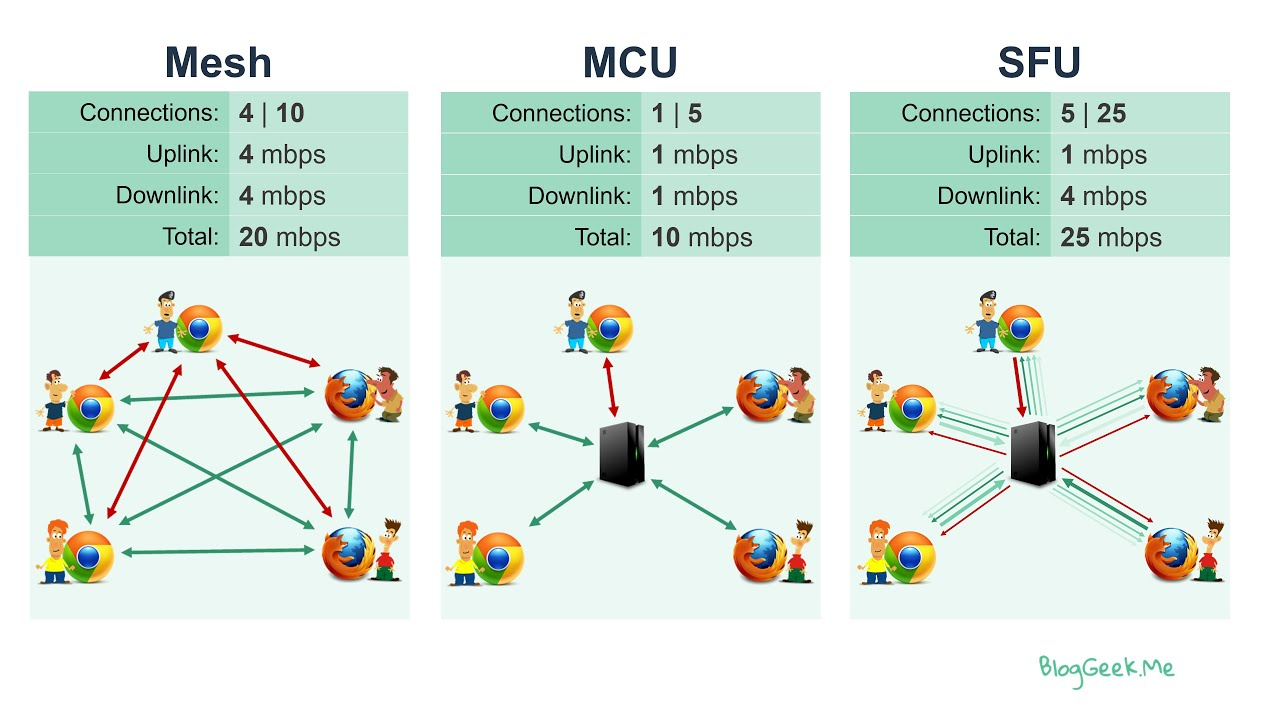
Backend
The MatrixRTC functionality is handled via LiveKit.
Frontend

Hello ELement-Call!

Now that you’ve installed the needed building blocks, let’s adapt the Frontend.
Writing and Running the ELement-Call frontend
First, we make a new project using Cargo. With its .toml file we allow Rust to declare the various dependencies and metadata. That ensures that you’ll always get a repeatable output of the build.
Go ahead like so:
$ cargo new element-call
$ cd element-call
The first command, cargo new, takes the name of the project
(“element-call”) as the first argument. The second command changes to
the new project’s directory.
Look at the generated Cargo.toml file:
Filename: Cargo.toml
[package]
name = "element_call_hello_example"
version = "0.1.0"
authors = ["Your Name <you@example.com>"]
edition = "2021"

# See more keys and their definitions at https://doc.rust-lang.org/cargo/reference/manifest.html

[dependencies]
Listing 1-1: Default metadata “element_call_hello”
With cargo new, a default project structure is created. Maybe the
author information is already exchanged if Cargo could obtain a definition
from your environment. Cargo also generated source code for a “Hello, world!”
program. Let’s Check out the corresponding src/main.rs file:
Filename: src/main.rs
fn main() {
    println!("Hello, world!");
}
Listing 1-2: Default source file “main.rs”
No need to compile that stage with cargo run, since we are going to
exchange the project metadata, as well as the element-call source code right
away.
Update Cargo.toml
First reopen the Cargo.toml file and enter the Code in Listing 1-1 into Cargo.toml
Filename: Cargo.toml
[package]
name = "element_call_hello"
version = "0.0.1"
authors = [
	"Ralf Zerres <ralf.zerres.de@gmail.com>",
]
description = "The Element-Call - Training project"
documentation = "https://docs.rs/orbtk"
repository = "https://github.com/redox-os/orbtk"
readme = "README.md"
license = "MIT"
keywords = [
	"element-call",
	"matrix",
	"matrixrtc",
]
edition = "2021"

[profile.dev]
opt-level = 1

[dependencies]
#element-call = { git = "https://gitea.networkx.de/rzerres/element-call-book.git", branch = "develop" }

[[bin]]
name = "element_call_hello"
path = "src/main.rs"
Listing 1-1: Project metadata “Element-Call”
You may wonder, why the name property inside the Cargo.toml is
formatted like element_call.
name = "element_call_hello"
It is a good habit to follow rusts
naming convention, that encourages you to use snake_case
naming. While expanding the Element-Call example sources, we will keep
the grouping prefix element-call. That way we end up to call our first target
binary element-call_hello.
Update main.rs
All of the Element-Call specific code that is needed to build our first example “Hello Element-Call!” is shown in Listing 1-2. It goes to src/main.rs.
Filename: src/main.rs
use element-call::prelude::*;

fn main() {
    element-call::initialize();

        .run();
}
Listing 1-2: Code that creates a Window and prints “Hey Element-Call!”
Save the file and go back to your terminal window. Enter the following commands to compile and run the file:
$ cargo run --release element_call_hello
Compiling and Running Are Separate Steps
Before running an Element-Call application, you must compile its source code. A typical Element-Call project will generate the executable binary code using cargo and place the result in the target subfolder of the project.
Profiles may be used to configure compiler options such as optimization levels
and debug settings. By default the dev or test profiles are used. If the
--release flag is given, then the release or bench profiles are used.
$ cargo build --release --bin element-call-hello.rs
$ ../target/release/hello_element_call
On Windows, you need to use backslash as a path delimiter:
> cargo build --release --bin element-call-hello.rs
> ..\target\release\element_call_hello.exe
If you like to get debug feedback you can call the build process like this
$ cargo build --features debug --bin element-call-hello.rs
Installation
The first step is to install Rust. This is described in depth following Rust book Chapter 1
When creating a OrbTk application, we define the needed dependencies to the OrbTk crates in the Cargo.toml file of our project. The complile process will resolve the references and download the source as needed.
Command Line Notation
In this chapter and throughout the book, we’ll show some commands used in the terminal. Lines that you should enter in a terminal all start with
$. You don’t need to type in the$character; it indicates the start of each command. Lines that don’t start with$typically show the output of the previous command. Additionally, PowerShell-specific examples will use>rather than$.
Troubleshooting
WIP: What are the most common culprits? Can we provide some general, basic solutions
Local Documentation
OrbTk offers the option to install its documentation locally, so you can read it offline.
Any time a type, a function, a method or a crate is reference by the toolkit and you’re not sure what it does or how to use it, have a look at its application programming interface API documentation to find out!
Install Rust on Linux or macOS
If you are using Linux or macOS open up an terminal and copy and paste the text below and hit the enter key on your keyboard:
curl https://sh.rustup.rs -sSf | sh
Install Rust on Windows
Download and run the Rust windows installer from https://www.rust-lang.org/tools/install.
Install Redoxer (Redox OS)
If you want build and run your Rust application on a KVM capable OS for Redox you can use redoxer.
To install Redoxer you have to first install the rust toolchain. After that open up an terminal and copy and paste the text below and hit the enter key on your keyboard:
cargo +nightly install redoxer
To compile and run your application on Redox OS you should check the Redox OS Book.
Editor and IDE integration
A wide range of editors and IDE’s are providing support for Rust code like
- like syntax-highlighting
- auto-completion
- linting
- lsp support
VS Code
There is a big community that rely on the visualstudio implementation
to handle their code base. Following are the steps needed to expand
your installation to support VS Code for Rust development:
- Download VS Code from.
- Install Rust Language Server plugin (the Rust Language Server).
Alternative Editors and IDEs
If you perefer other solution, you will find in depth help inside the context of this inclomplete links:
ELement-Call Example Applications
This section provides Element-Call example apps. We hope to cover
interesting aspects of the API.
Take them as a tutorial, all listings are created as a reference. They have in mind to serve as an introduction to a specific topic. As educational content, this apps are marked with in-lined comments and anchors. If we did well, you can concentrate on the parts we like to emphasize.
Inside the library, you will find the collection of example code in
the subdirectory examples in crate element-call.
Hello Element-Call!
We already introduced the source in Chapter 01. For the sake of completeness, and since its a habit to begin with … here we go.
Element-Call Appendix
This is WIP
Element-Call Appendix - Keywords
This is WIP
Element-Call Appendix - Operators
This is WIP
Element-CAll Appendix - Derivable Traits
This is WIP
Appendix D: Translations of the Book
For resources in languages other than English. This is work in progress; see the Translations label to help or let us know about a new translation!